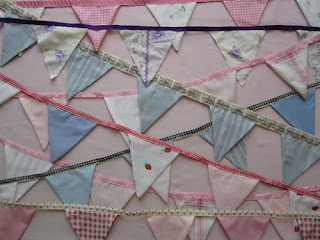
I'm sure many of you know how to make bunting but there are lots of different methods so I thought I would share mine.
Usually I'm one for cutting corners - if there's a quicker way to do something I'll do it! But for this project I wanted to do something the right way for a change, which I think is why I loved the finished product so much, I was proud of my hard work and dedication - this literally took me weeks to finish! (because I have a short attention span so had to do it in lots of little sessions.)
OK, on with the show!
The first thing I did was cut out my triangles, I measured 6 inches across and 6 inches down from that line to get my first triangle, then used that piece of fabric as my template (OK so maybe I took one short cut, I should of cut out a cardboard template, and I wish I did, I use one now and it's a lot easier!)
Once all my triangles were cut out I cut some wadding in the same shape and tore it into thin layers. (It's should come apart easily.)
Next I layered two triangles with the right sides facing inwards then wadding on top and sewed.
Start from one of the top corners, work your way down to the point, lift your presser foot, twist and work your way up to the other corner. (NOT what I did on my first triangle, which was go down one side, finish off then start down the other side to discover the fabric is bunched up at the point!)
Turn all your triangles inside out and iron, and you have your flags : )
For the binding I used 3 metres of ribbon (1 inch width), I've recently discovered that bias binding works better but I was still learning at this point.
So what I did was iron the ribbon in half length ways, slot each flag into it, then sew along the open edge.
I used 13 flags with a 3 inch gap between each one.
The finished product!!
These are all the pieces of bunting I've made so far, which I sold to Coco's
If you would like to buy some bunting my shop is: etsy.com/shop/lauralynncrafts
(Please note: the bunting I sell doesn't include the wadding - it was getting too expensive and time consuming and that was the best way to reduce the cost without losing quality)
Vote For Me!
(It only takes one click)
Partying @ threadingmyway
(Monday) makingtheworldcuter, sewchatty, sewcando, skiptomylou, firefliesandjellybeans, etcetorize, everythingunderthemoon, notjustahousewife, graphicsfairy, thegirlcreative, creatingreallyawesomefreethings, craftomaniac, thegunnysack, linesacrossmyface, sumossweetstuff, alderberryhill, inspiredbyfelicity, vintagemauve, cedarhillranch, serendipityandspice, brassyapple, etcetorize
(Tuesday) ladybugblessings, coastalcharm, thecreativeitchboutique, romanceonadime, tipjunkie, todayscreativeblog, hopestudios, sugarbeecrafts, cleanandscentsible, lilluna, kammyskorner, athomewithk, myuncommonsliceofsuburbia, homestoriesatoz, itsoverflowing, elizabethandco, teaganstravels, uncommondesignsonline, debbiedoescreations, housewivesofriverton, adventuresofadiymom
(Wednesday) nightowlcrafting, gingersnapcrafts, somedaycrafts, junkintheirtrunk, thestuffofsuccess, tearosehome, sew-much-ado, acreativeprincess, houseofhepworths, thenymelrosefamily, thetrendytreehouse, micheleravendesigns, freeprettythingsforyou, creationsbykara, myrepurposedlife, theshadyporch, thediydreamer, jaqsstudio, jaimelyn11, raegunwear, spruceyournest
(Thursday) firefliesandjellybeans, delightfulorder, kadie-sevenalive, somewhatsimple, beyondthepicketfence, theshabbycreekcottage, momnivoresdilemma, the36thavenue, thevintagefarmhouse, lovenotesbylauryn, thetreasurista, staceyembracingchange


